MS Entra Integration
Important Links
Microsoft Entra Admin Center:https://entra.microsoft.com/
App registrations:App registrations
Kibi Connect uses OAuth2 / OpenID Connect (OIDC) – no SAML
The connection to Microsoft Entra is done exclusively via OAuth2 / OpenID Connect (OIDC). SAML is not supported and is not required.
This means specifically:
All configuration is done in the App registration (under Identity > Applications > App registrations). The SAML configuration page of an Enterprise Application is not relevant.
No SAML identifiers, SAML certificates, or SAML claims are required.
#1. Create Enterprise Application
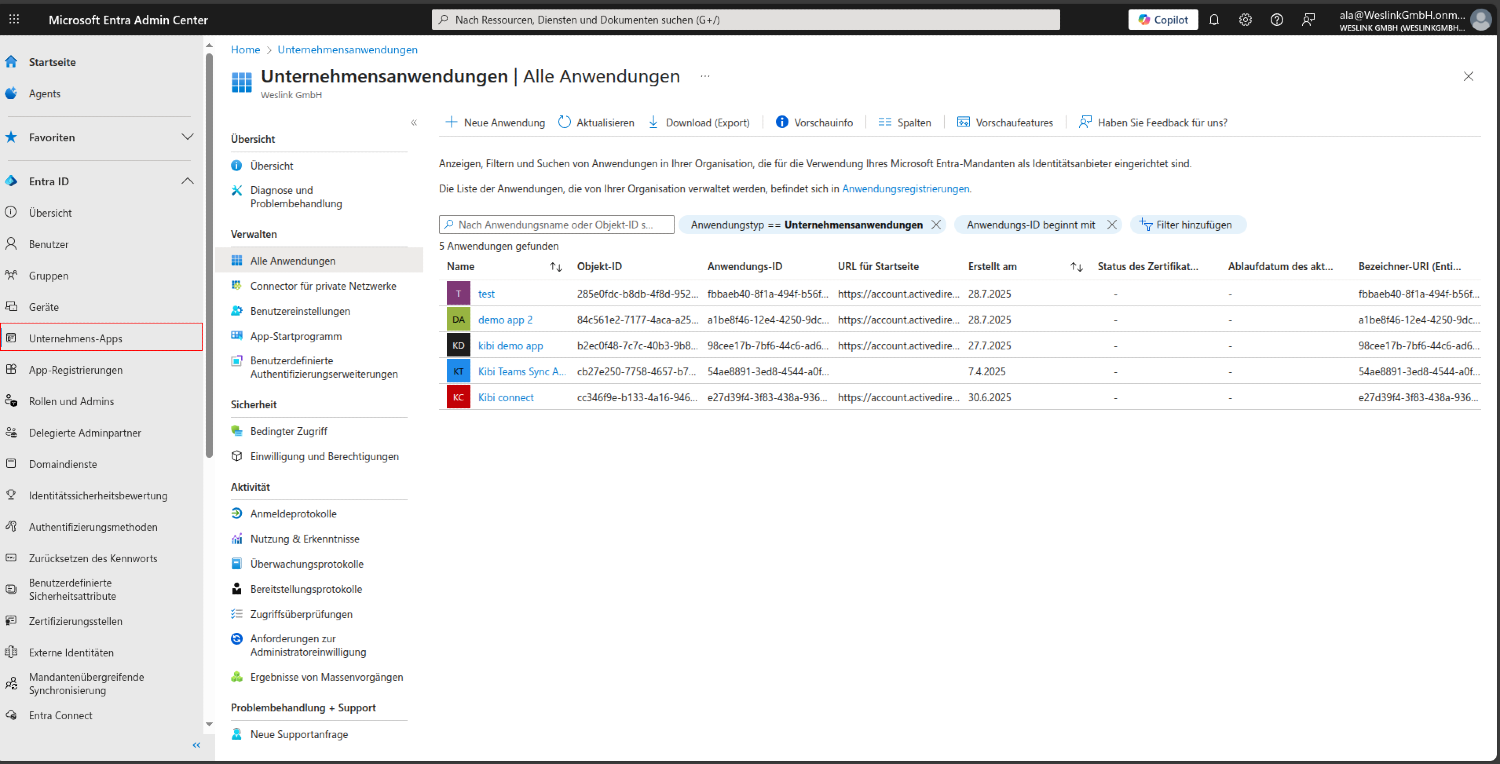
#Step 1.1: Navigate to Enterprise Apps
In the Microsoft Entra Admin Center, look in the left sidebar for:
Home (house icon)
Entra ID (expanded section)
Enterprise Apps - Click on this option
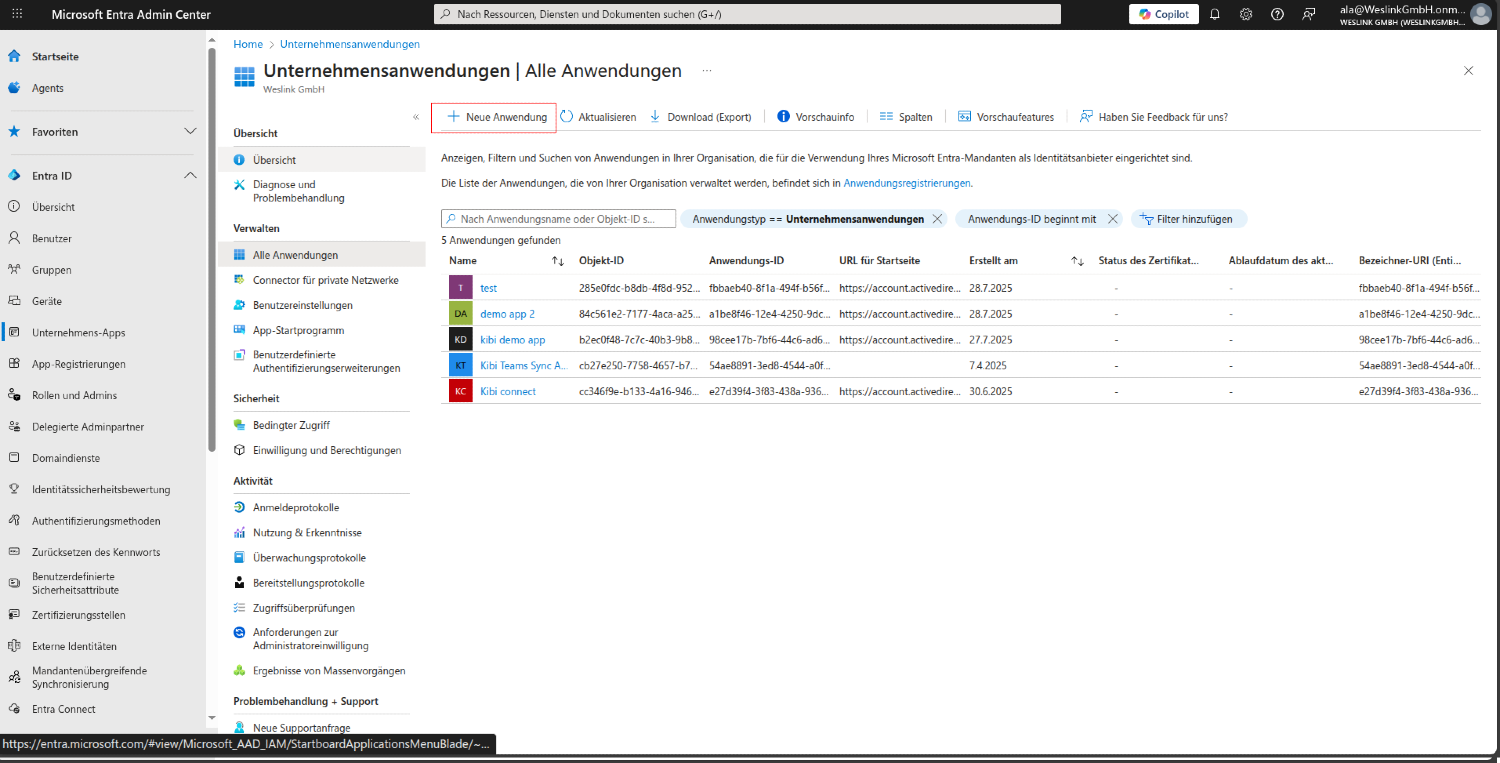
#Step 1.2: Click "New Application"
On the Enterprise Apps page, look for the action buttons at the top.
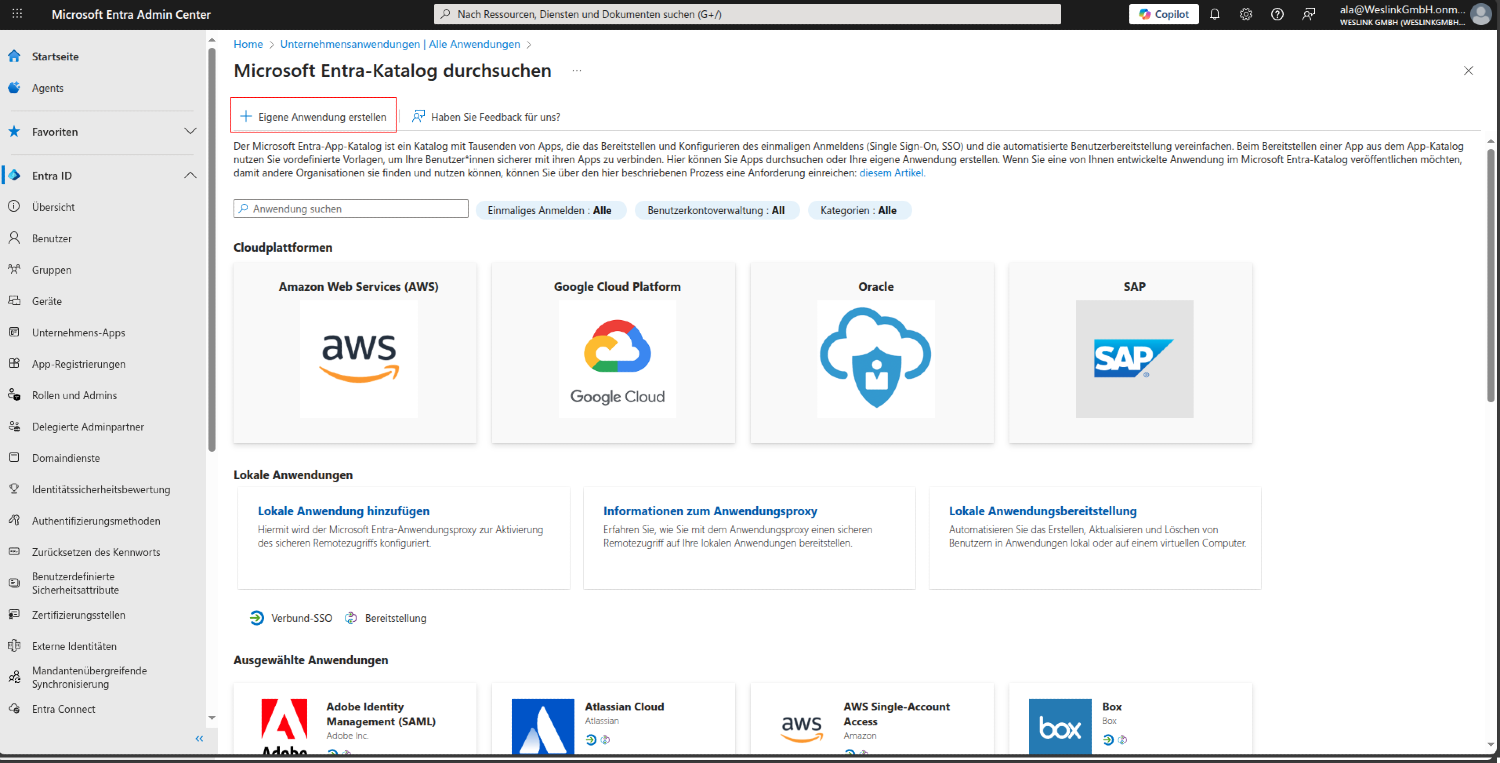
#Step 1.3: Select "Create your own application"
A modal window opens with several options. Look for:
Create your own application - Click on this option
This opens a side panel for configuration
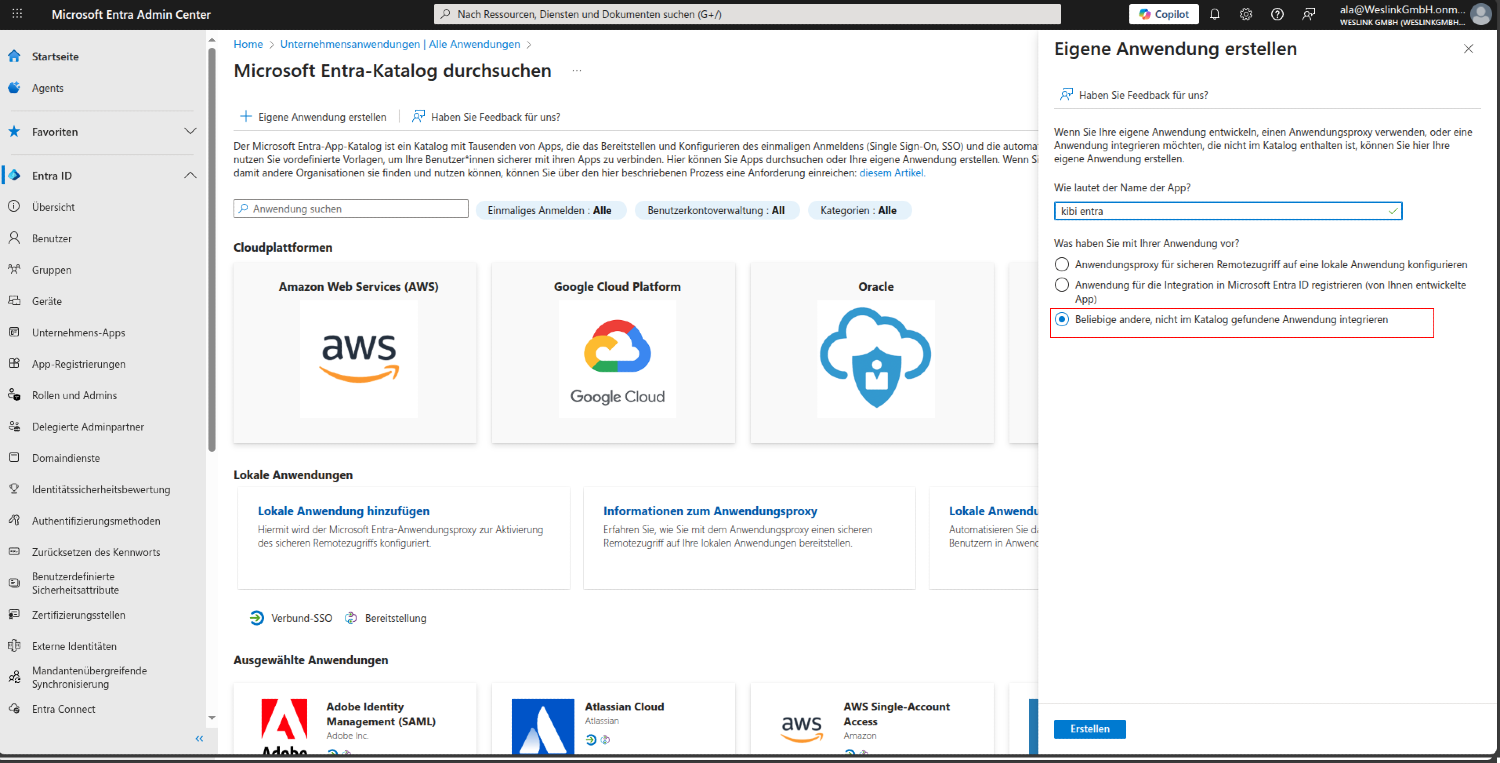
#Step 1.4: Configure Application Details
In the side panel that opens, you must:
Name: Enter your application name (e.g., Kibi demo app)
Important: Make sure you select Integrate any other application you don't find in the gallery (Non-gallery)
#Step 1.5: Confirm Application Creation
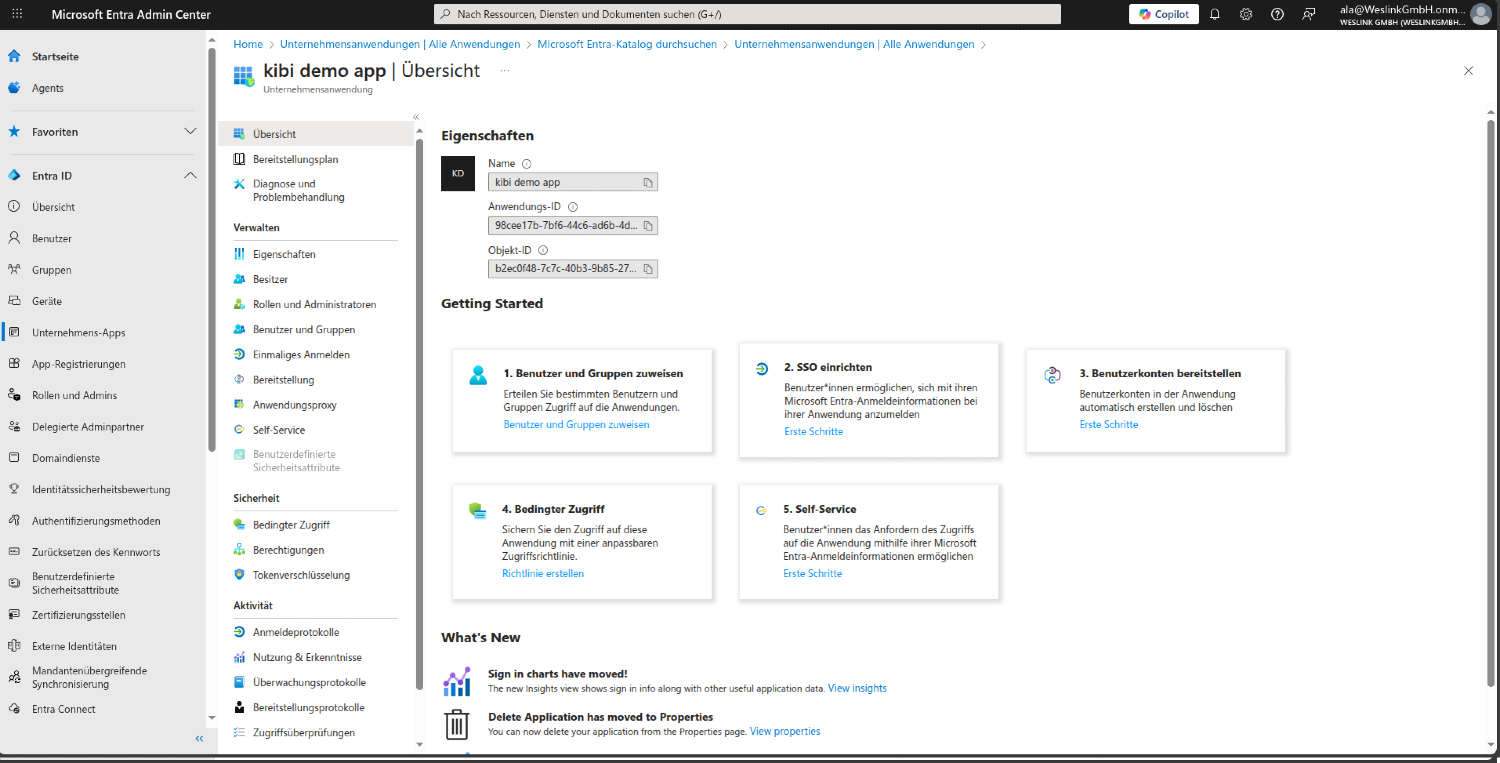
After clicking Create, you will be redirected to the application overview page. Confirm that:
Your application name appears in the title
You can see the Application ID (Client ID)
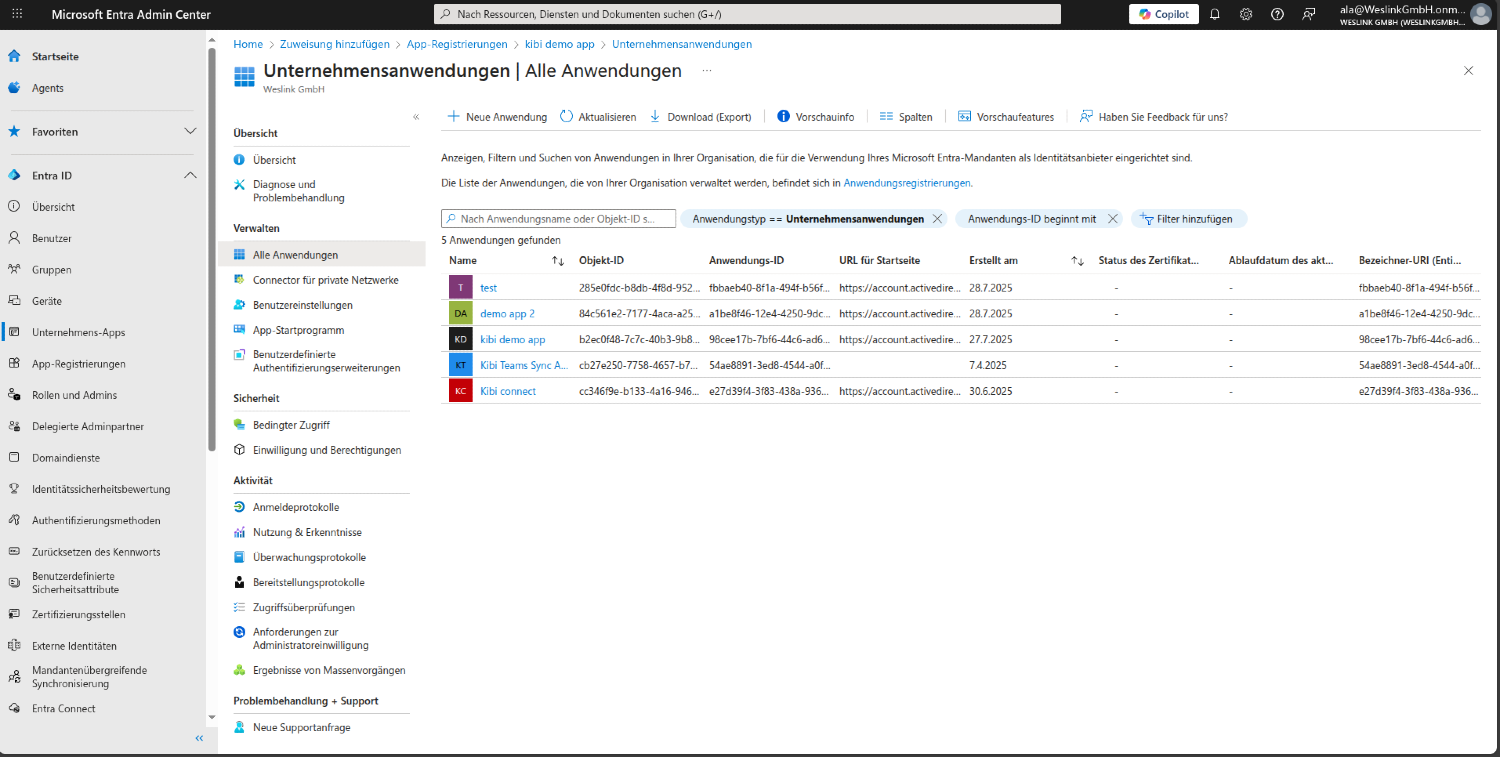
The application appears in your Enterprise Apps list
#2. Create App Client Secret
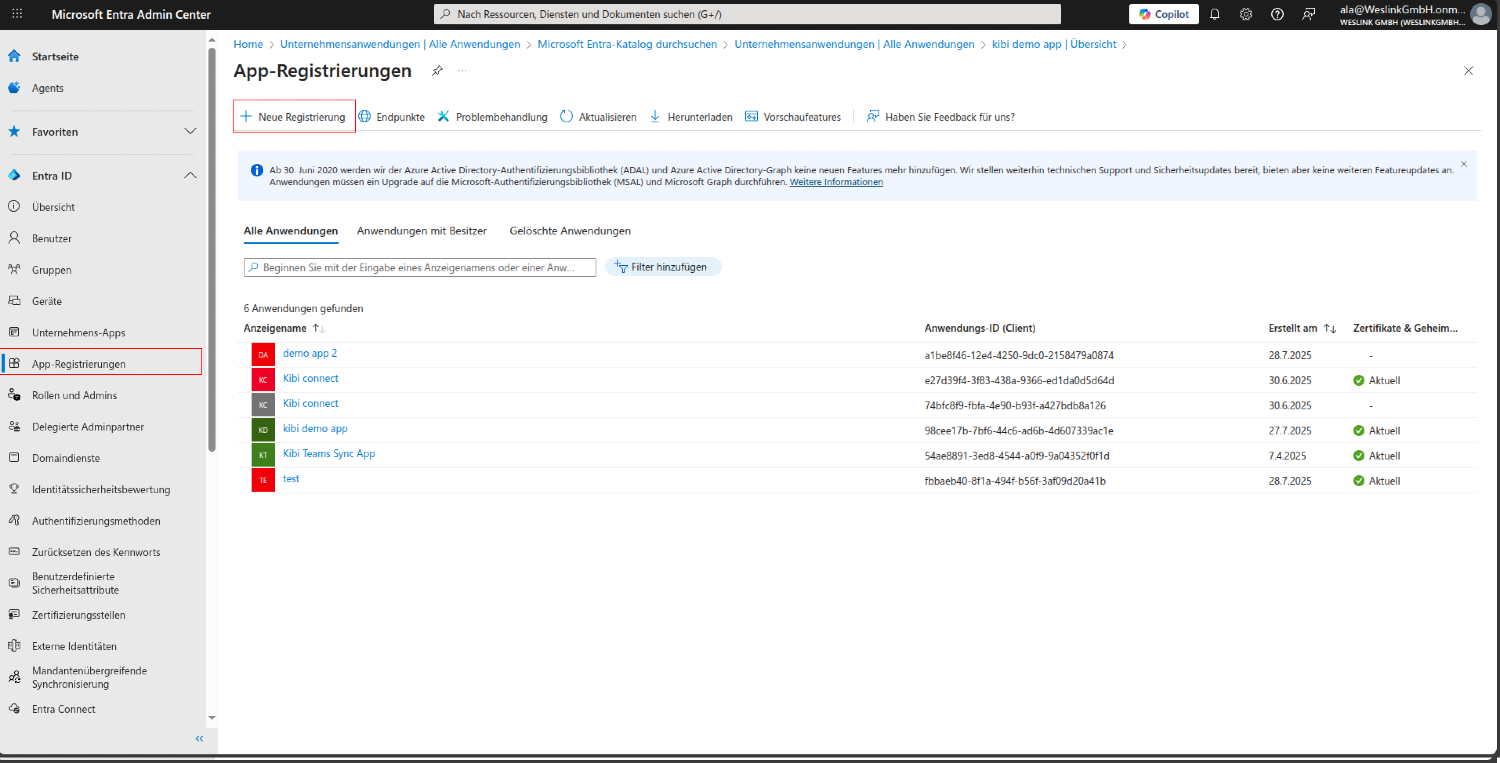
#Step 2.1: Navigate to App Registrations
In the left sidebar, look for and click on App registrations.
Select All applications
Select your application from the list
#Step 2.2: Access Certificates and Secrets
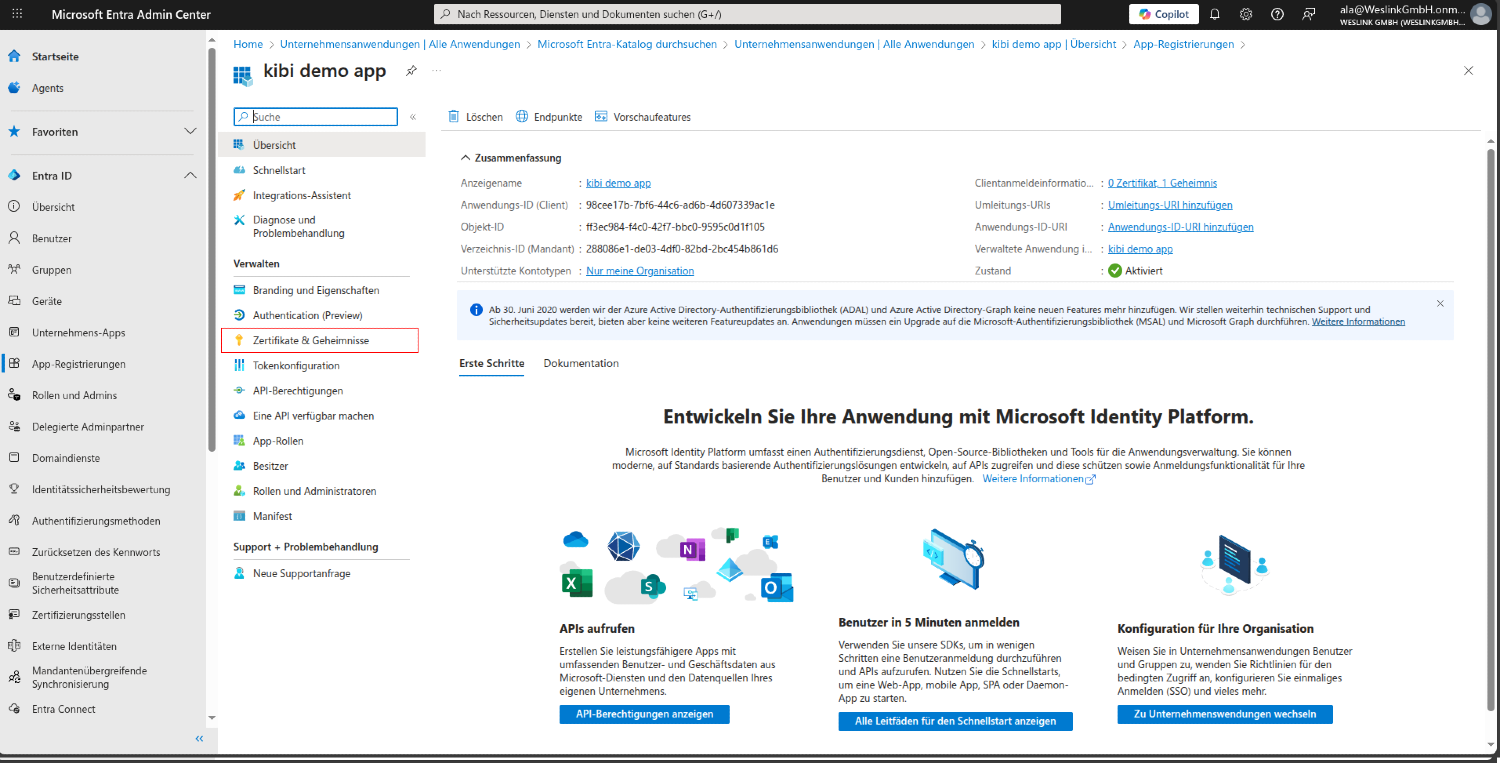
In the application details, look in the left menu for and click on Certificates and secrets.
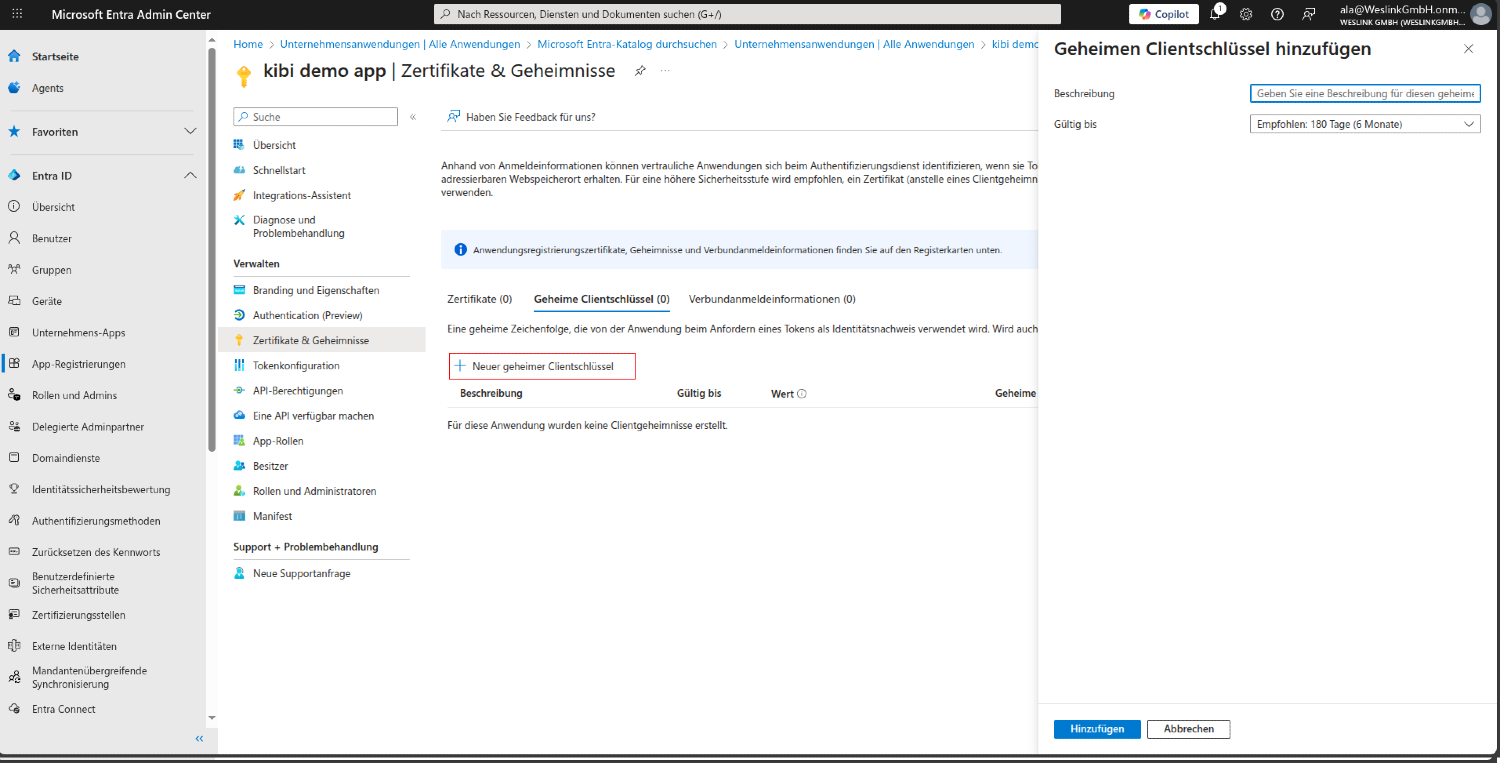
#Step 2.3: Create New Client Secret
On the Certificates and secrets page:
Click on + New client secret
Add a description (e.g., Kibi Connect Integration)
Select expiration (recommend 12 months or longer)
Click on Add
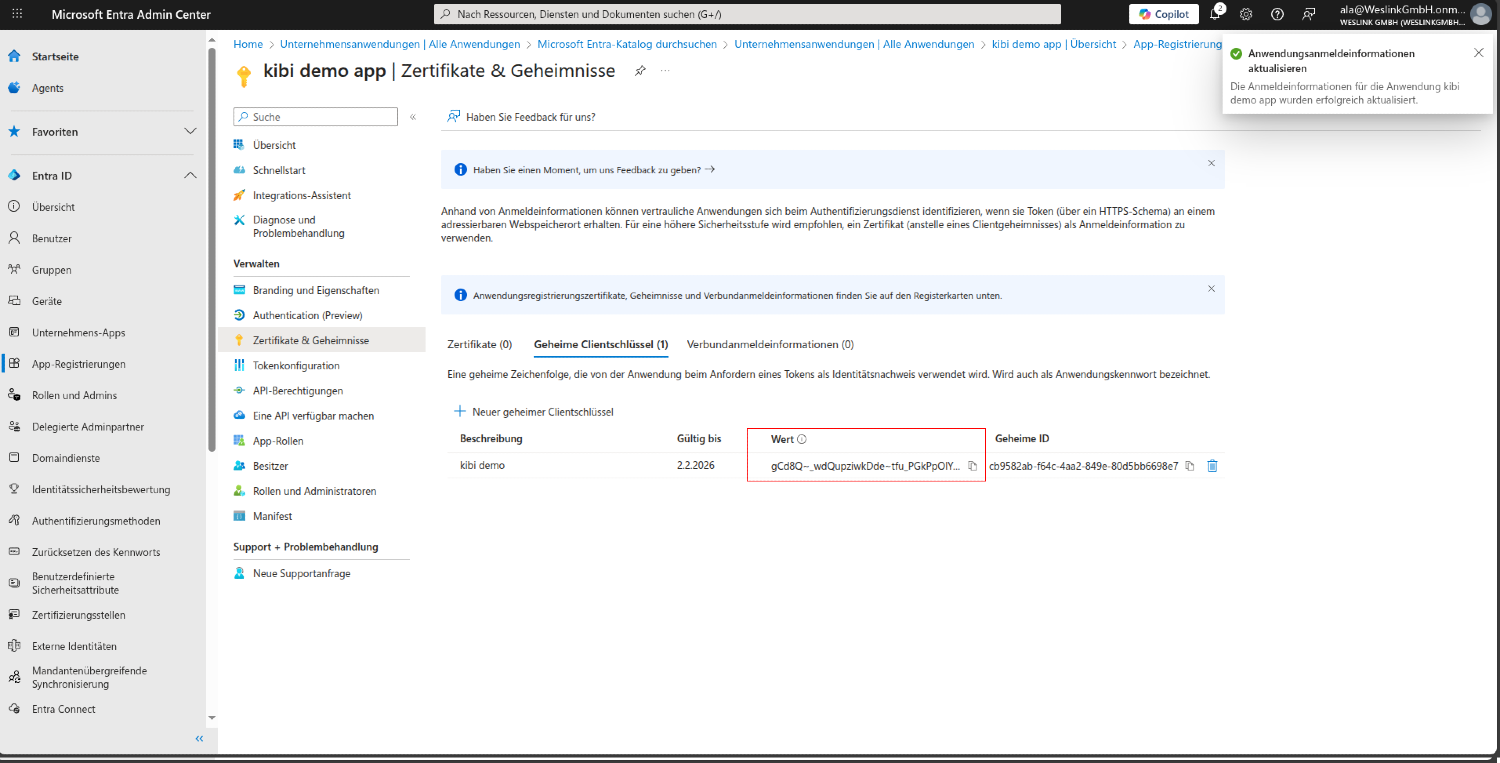
#Step 2.4: Copy the Secret Value
IMPORTANT: After creating the secret, you will only see the secret value once. Copy it immediately!
Warning: The secret value will be hidden after you leave this page. Make sure you copy it to a secure location.
#3. Configure Application Permissions
#Step 3.1: Navigate to App Registrations
In the left sidebar, look for and click on App registrations.
Select All applications
Select your application from the list
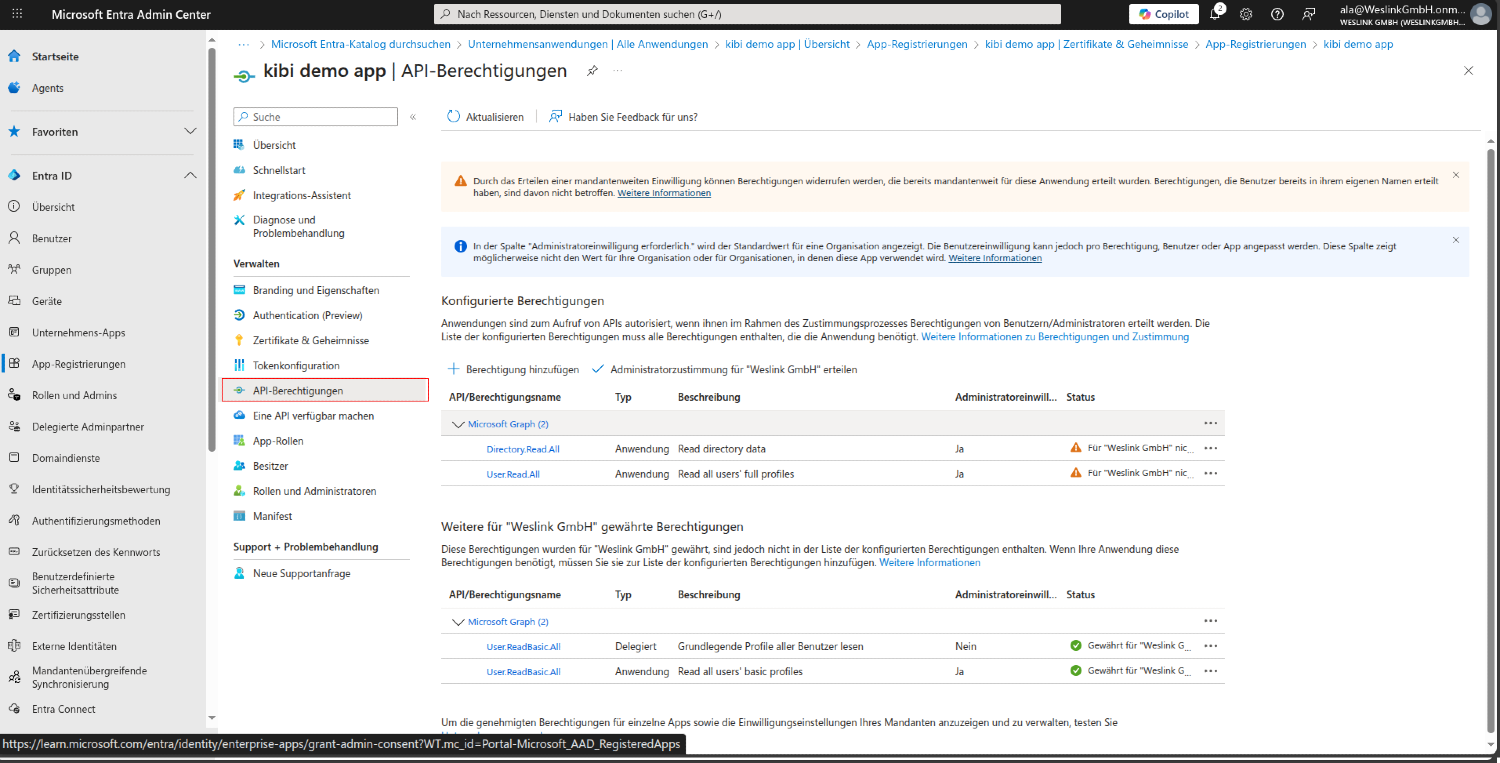
#Step 3.2: API Permissions
In the application details, look in the left menu for and click on API permissions.
#Step 3.3: Add Microsoft Graph Permissions
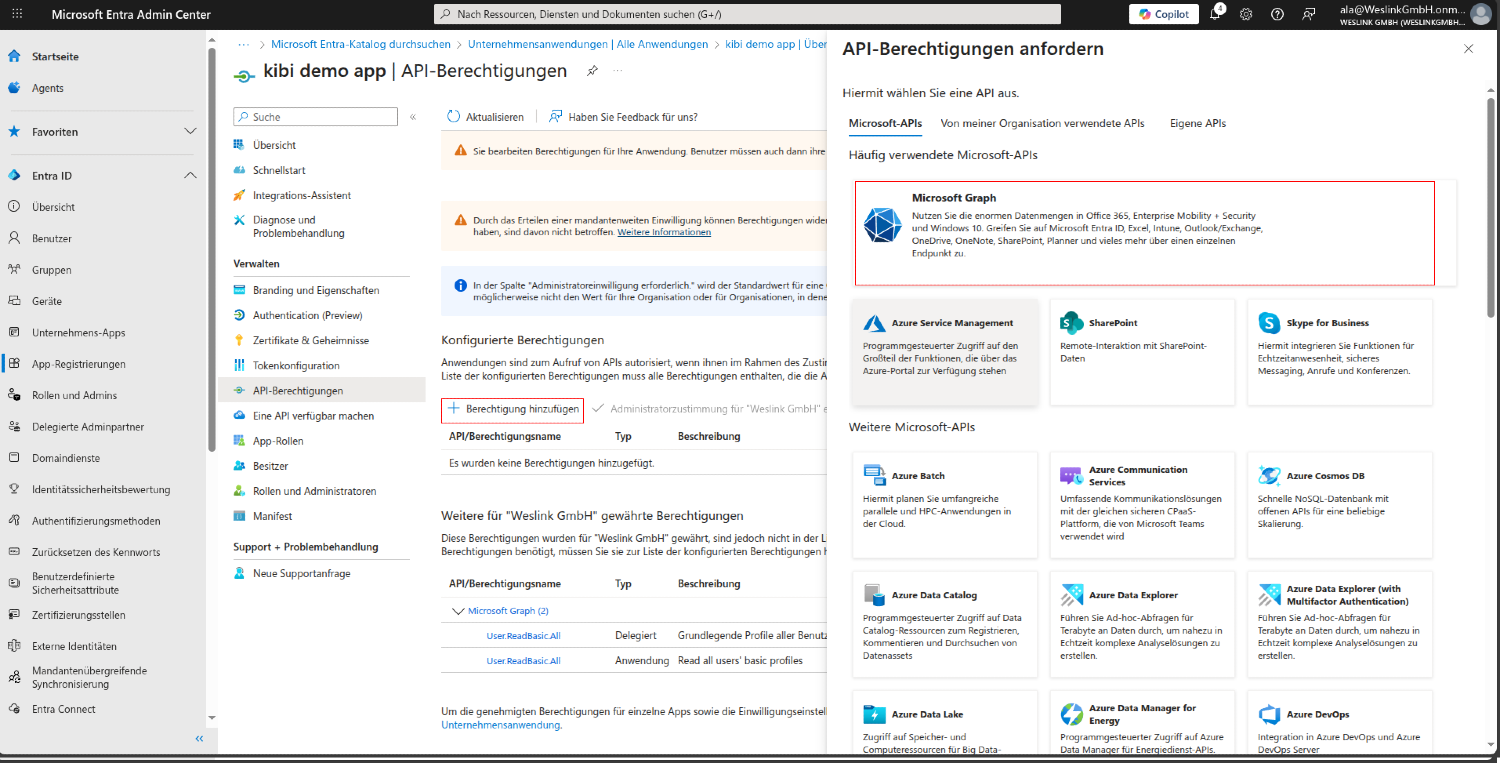
On the API permissions page:
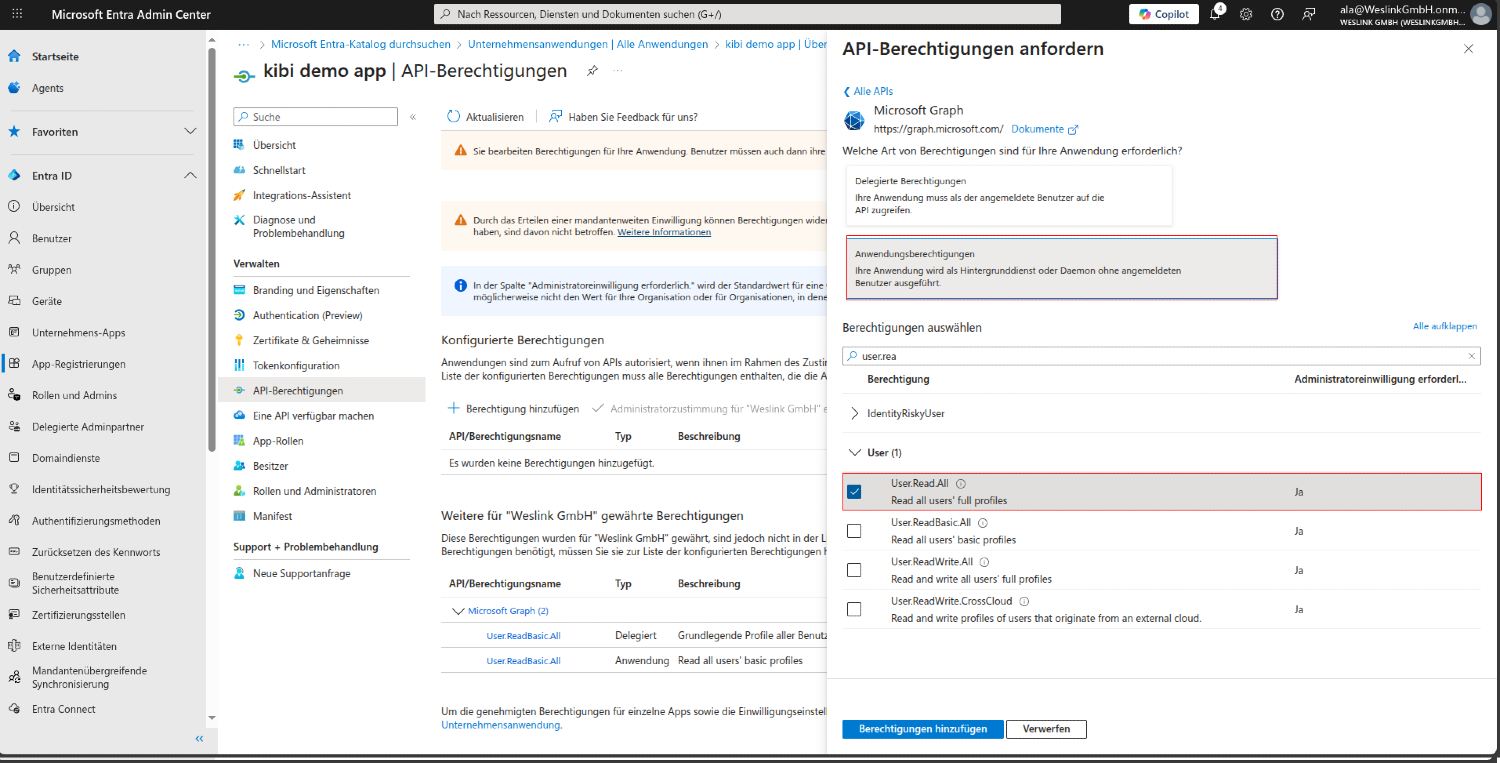
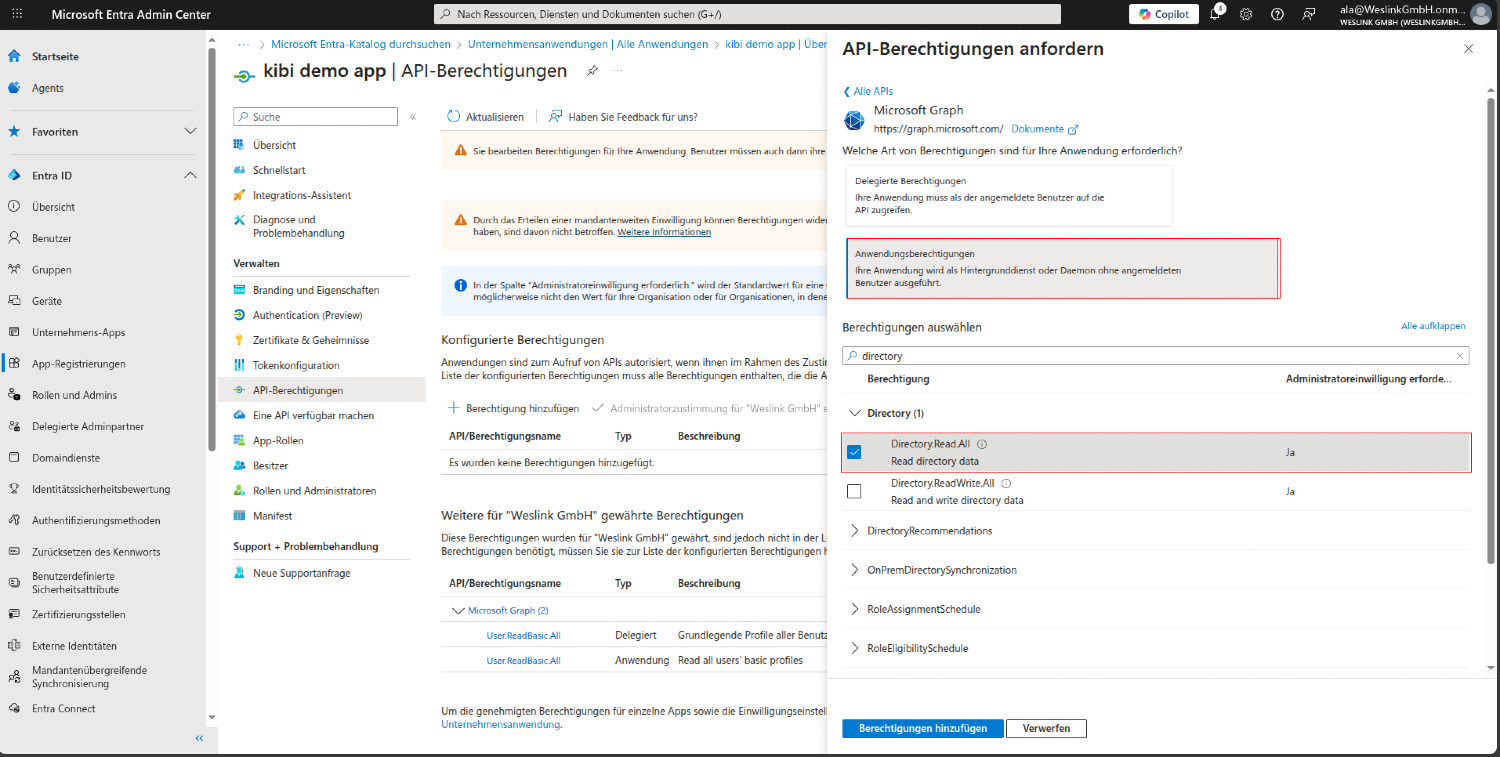
Click on + Add a permission
Select Microsoft Graph
Select Application permissions
Search for User.Read.All under User
Search for Directory.Read.All under Directory
Click on Add permissions
#Step 3.4: Grant Admin Consent
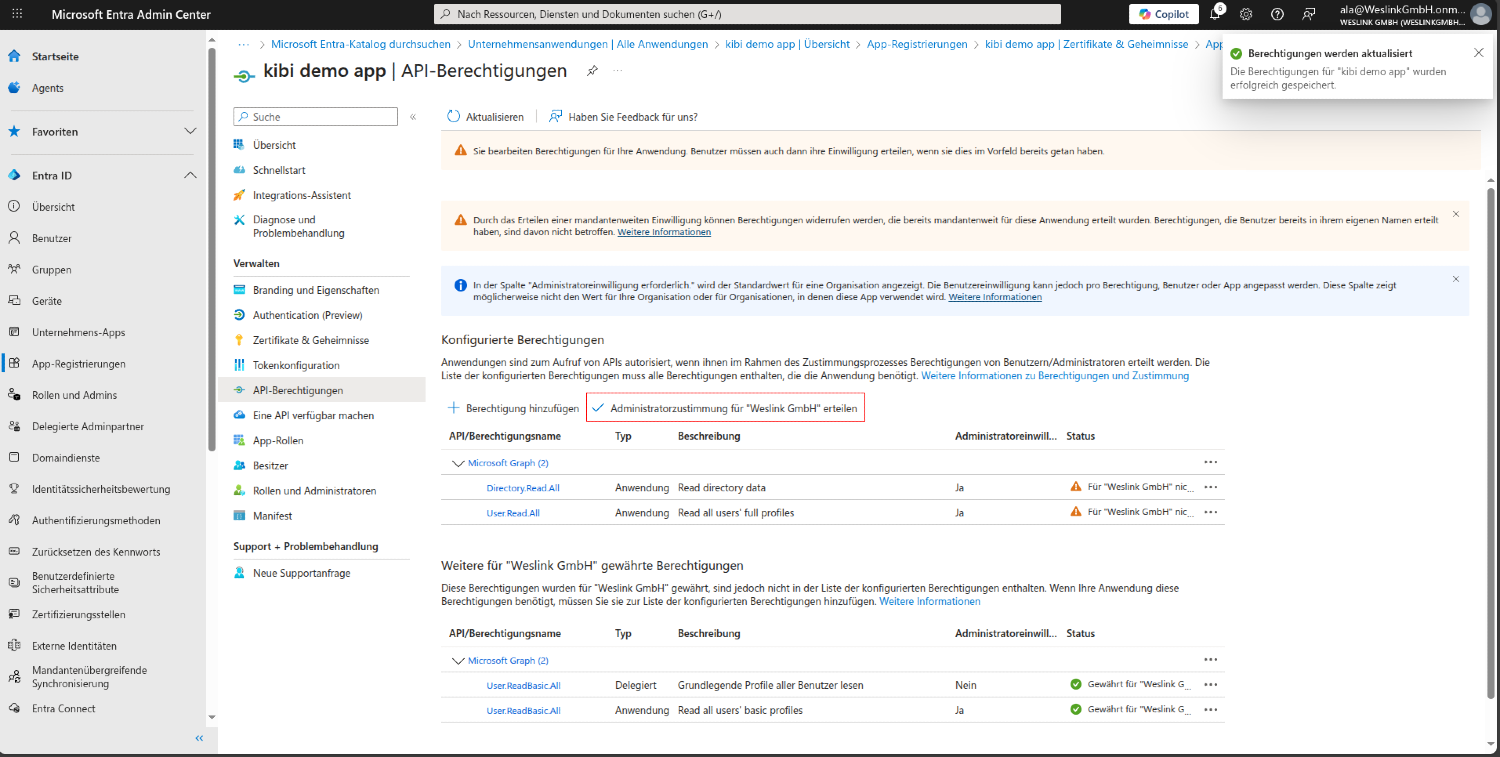
IMPORTANT: Grant the application admin consent, otherwise synchronization will not work.
Click on Grant admin consent
Click on Yes
#Step 3.5: Permissions for Single Sign-On (Delegated Permissions)
If you want to use SSO ("Sign in with Microsoft"), you need additional delegated permissions:
Click again on + Add a permission
Select Microsoft Graph
This time select Delegated permissions
Search and enable the following permissions:
openid– OpenID Connect loginprofile– Read user profileemail– Read email addressUser.Read– Read signed-in user profile
Click on Add permissions. Then grant admin consent again.
#3b. Configure Redirect URI for SSO
This step is only required if you want to use Single Sign-On (SSO).
#Step 3b.1: Enter Redirect URI
In your App registration, click on Authentication in the left menu.
Click on + Add a platform
Select Web
Enter the following Redirect URI:
https://YOUR-DOMAIN/auth/microsoft/callback
Replace YOUR-DOMAIN with the domain of your Kibi Connect tenant (e.g., companyname.kibi.de).
Example: https://mycompany.kibi.de/auth/microsoft/callback
Click on Configure.
#4. Assign Users to Your Application (Optional)
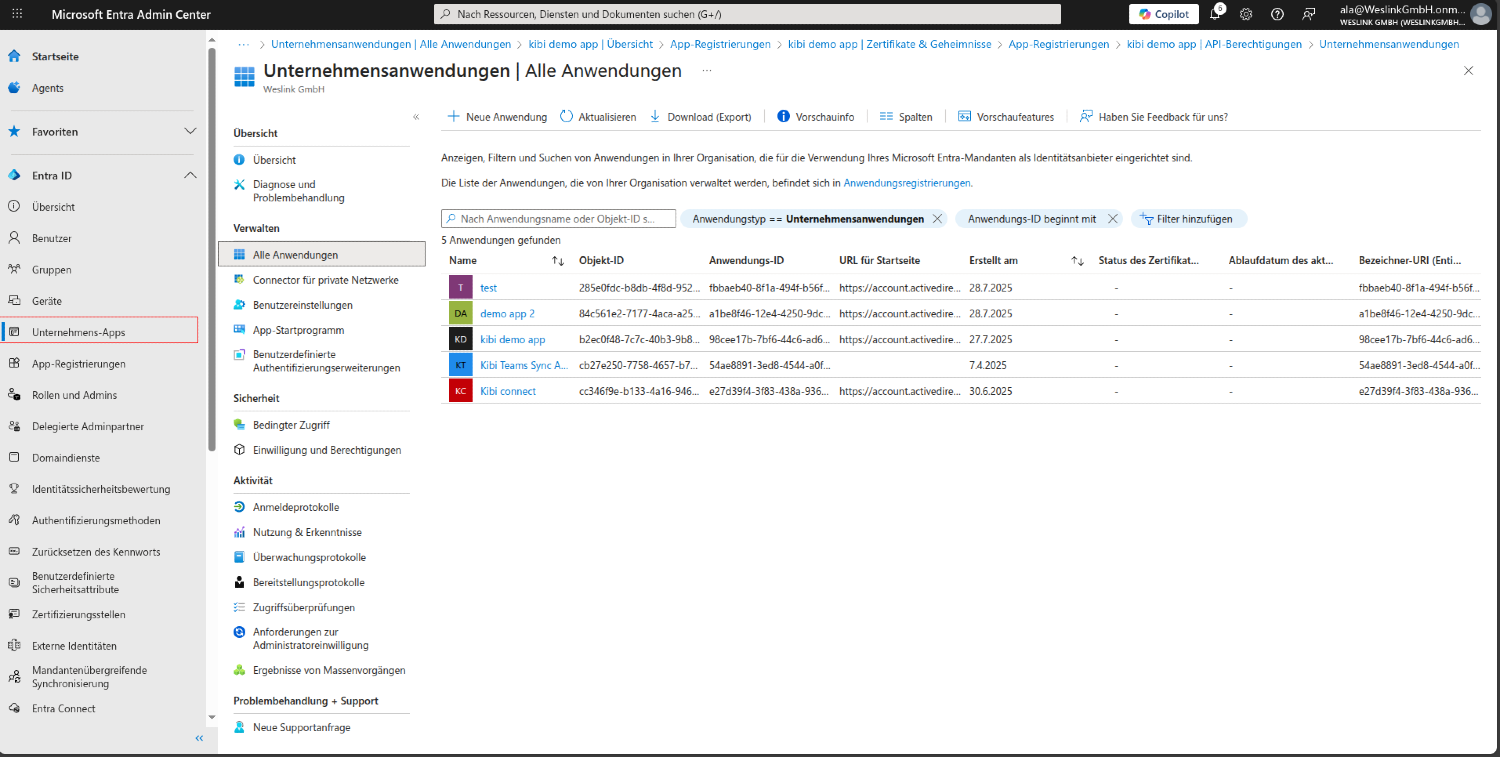
#Step 4.1: Navigate to Enterprise Apps
In the left sidebar, look for and click on Enterprise Apps.
Select your application from the list
#Step 4.2: Access Users and Groups
In the application details, look in the left menu for and click on Users and groups.
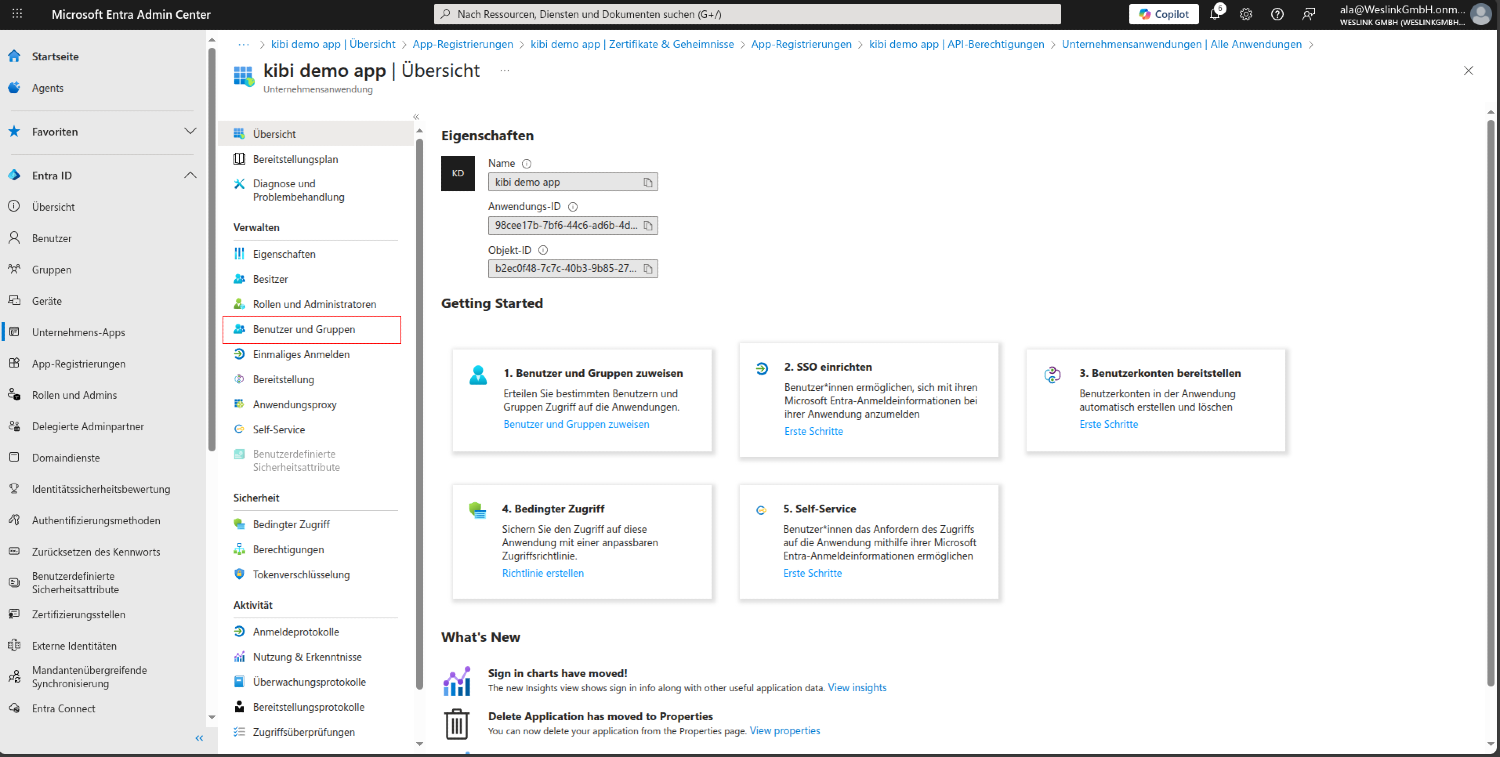
#Step 4.3: Assign Users to Your Application
On the Users and groups page:
Click on + Add user/group
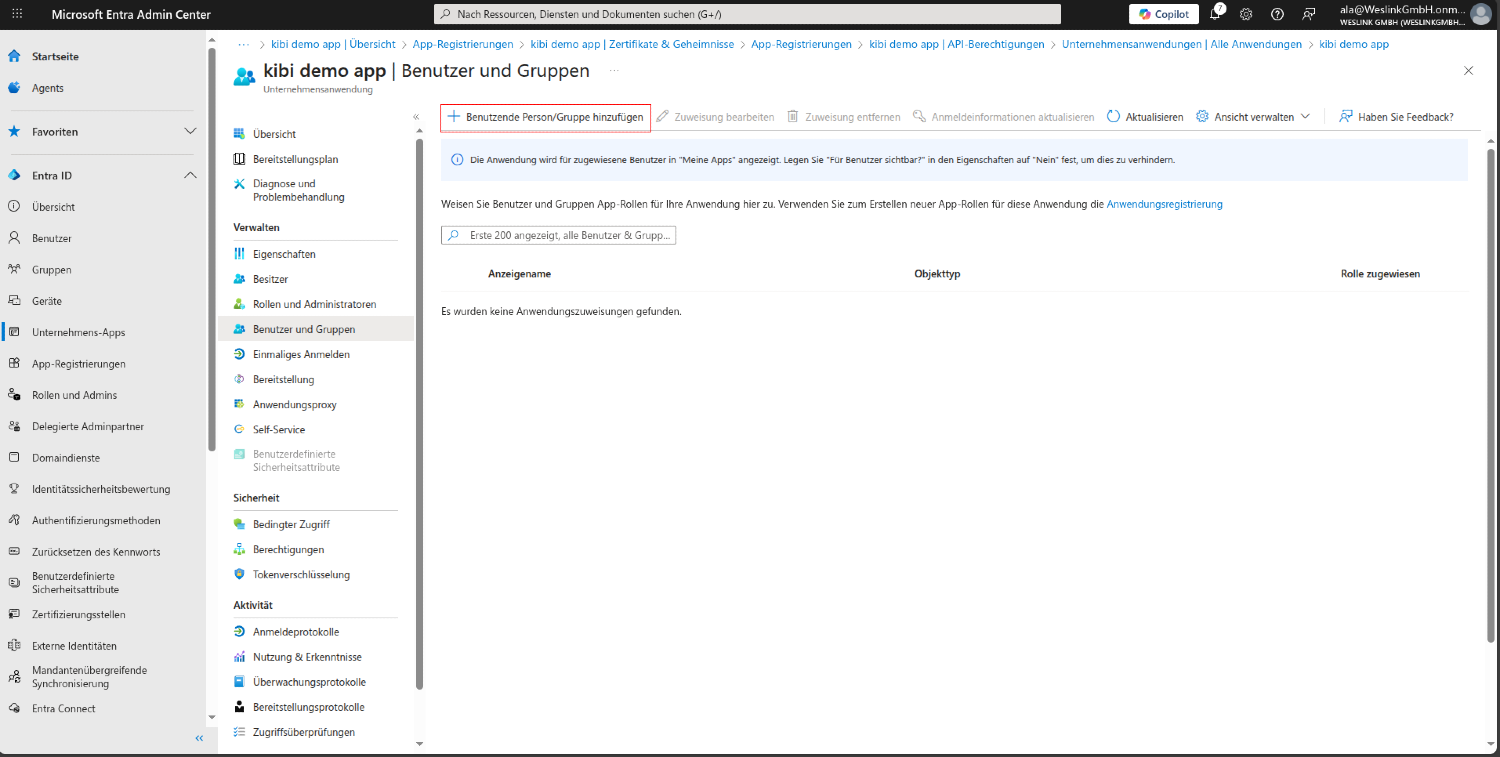
#Step 4.4: Confirm Assignment
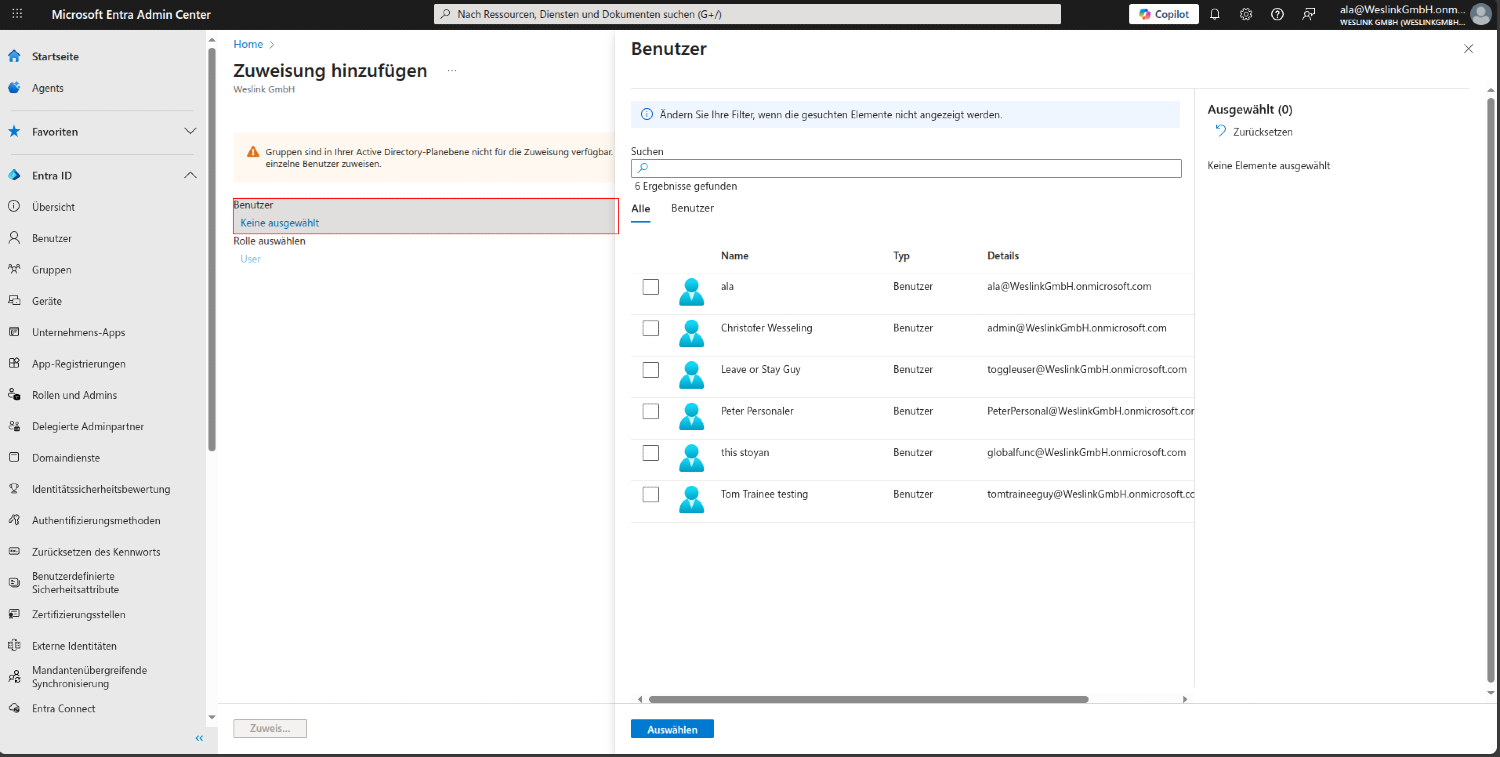
On the Add assignment page:
Click on Users
Select the users you want to assign to your application
Click on Select
#5. Kibi Connect Configuration
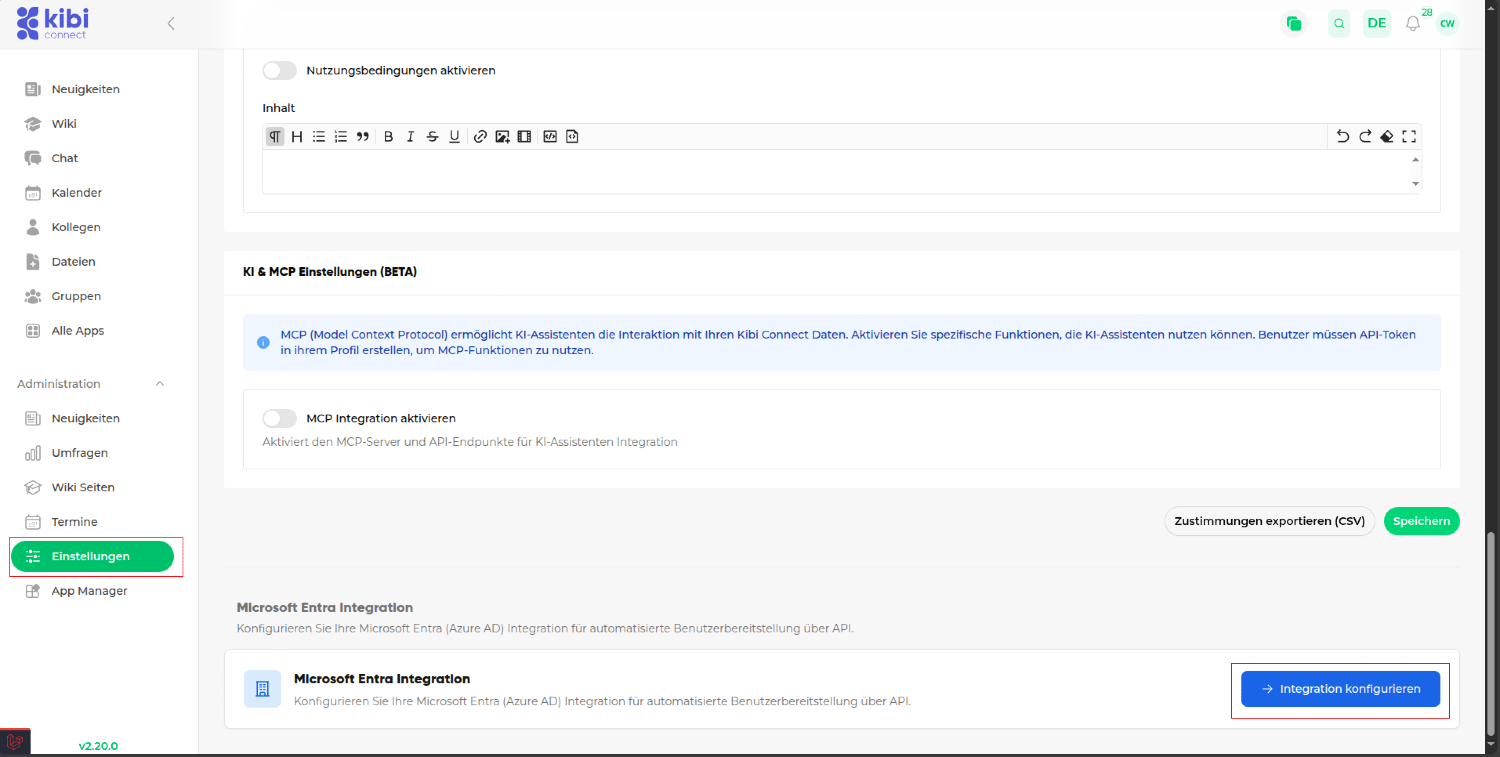
#Step 5.1: Navigate to Settings in Kibi Connect
In the left sidebar, look for and click on Settings.
Scroll down to the Microsoft Entra Integration section
Click on Configure Integration
#Step 5.2: Configure Integration
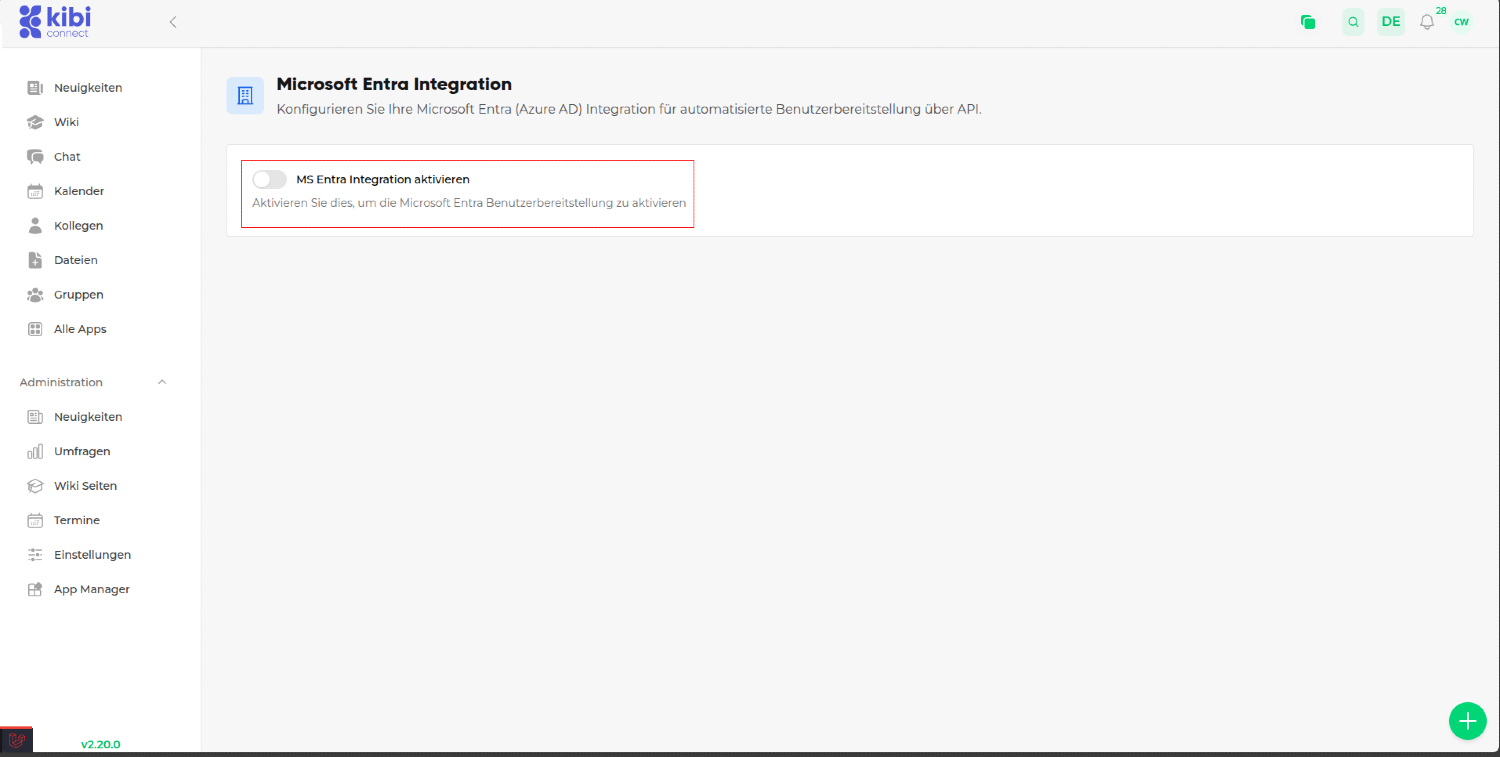
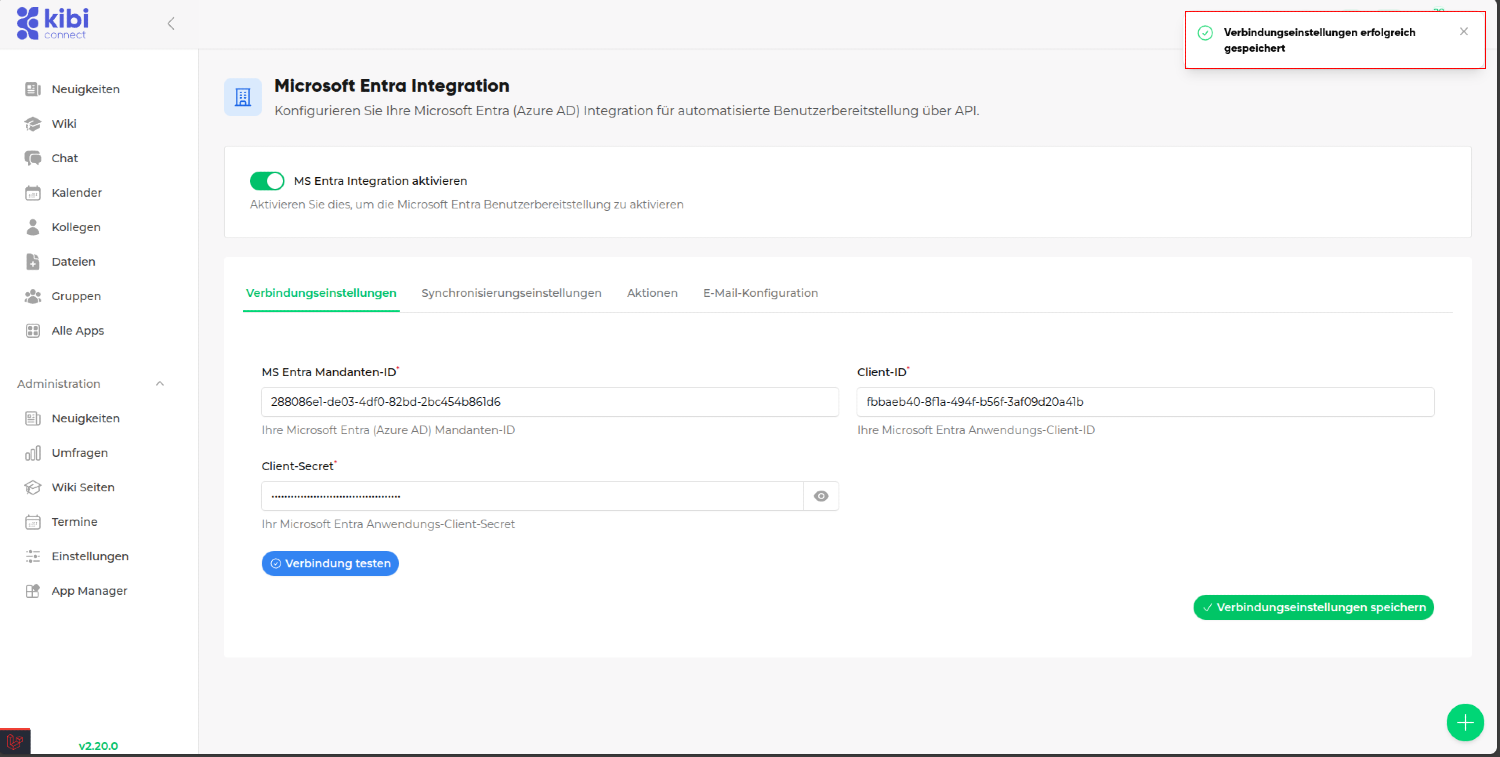
On the Microsoft Entra Integration page:
Click on Enable Integration
#Step 5.3: Add Keys to Connection Settings
After enabling, you will see the following fields:
Connection settings
Synchronization settings
Actions
Setup guide
Click on Connection settings to add the keys.
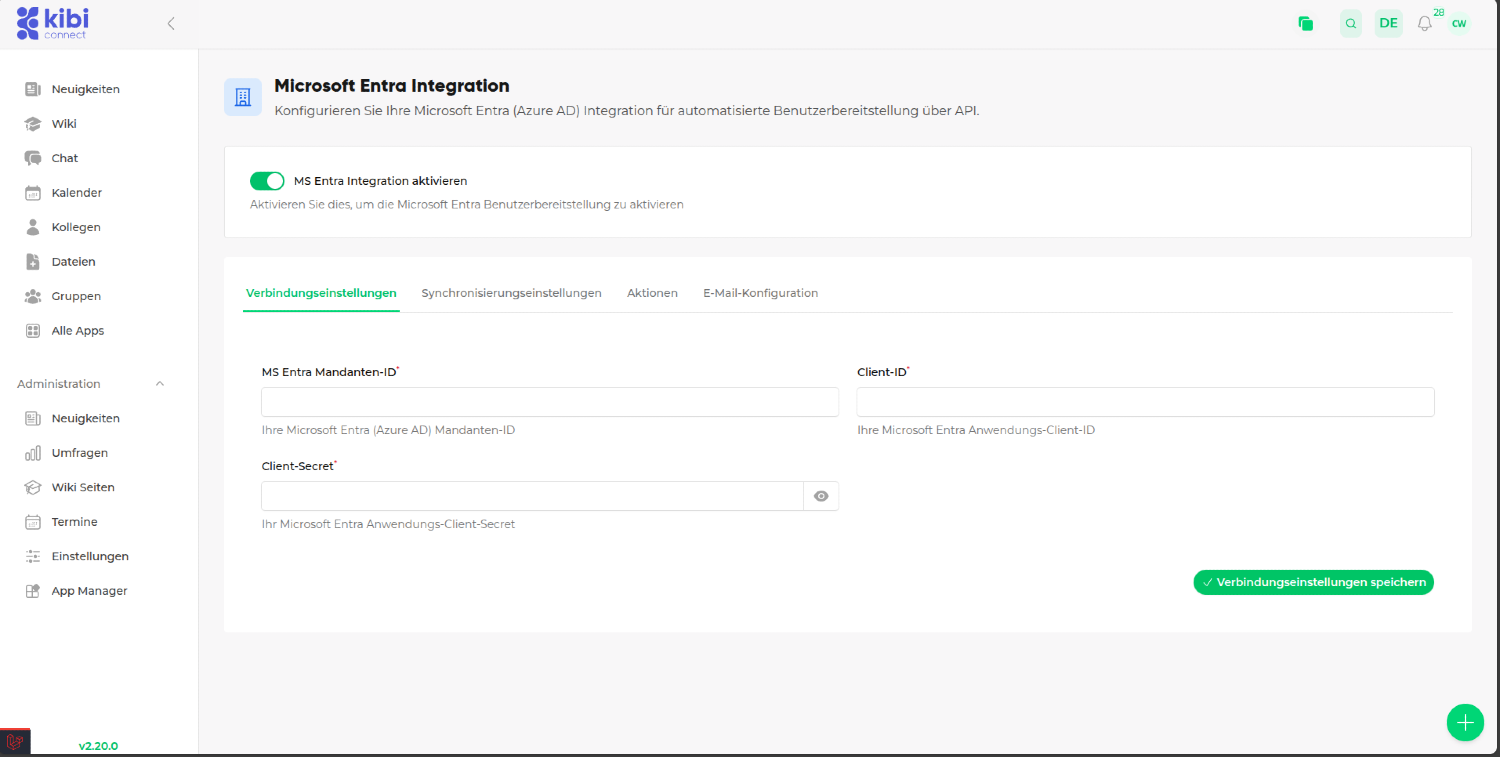
Now you need to add the keys to the connection settings:
Tenant ID
Client ID
Client Secret
The keys are located in your newly created application overview in Microsoft Entra App registrations.
The Client Secret is on the Certificates and secrets page (Step 2.4).
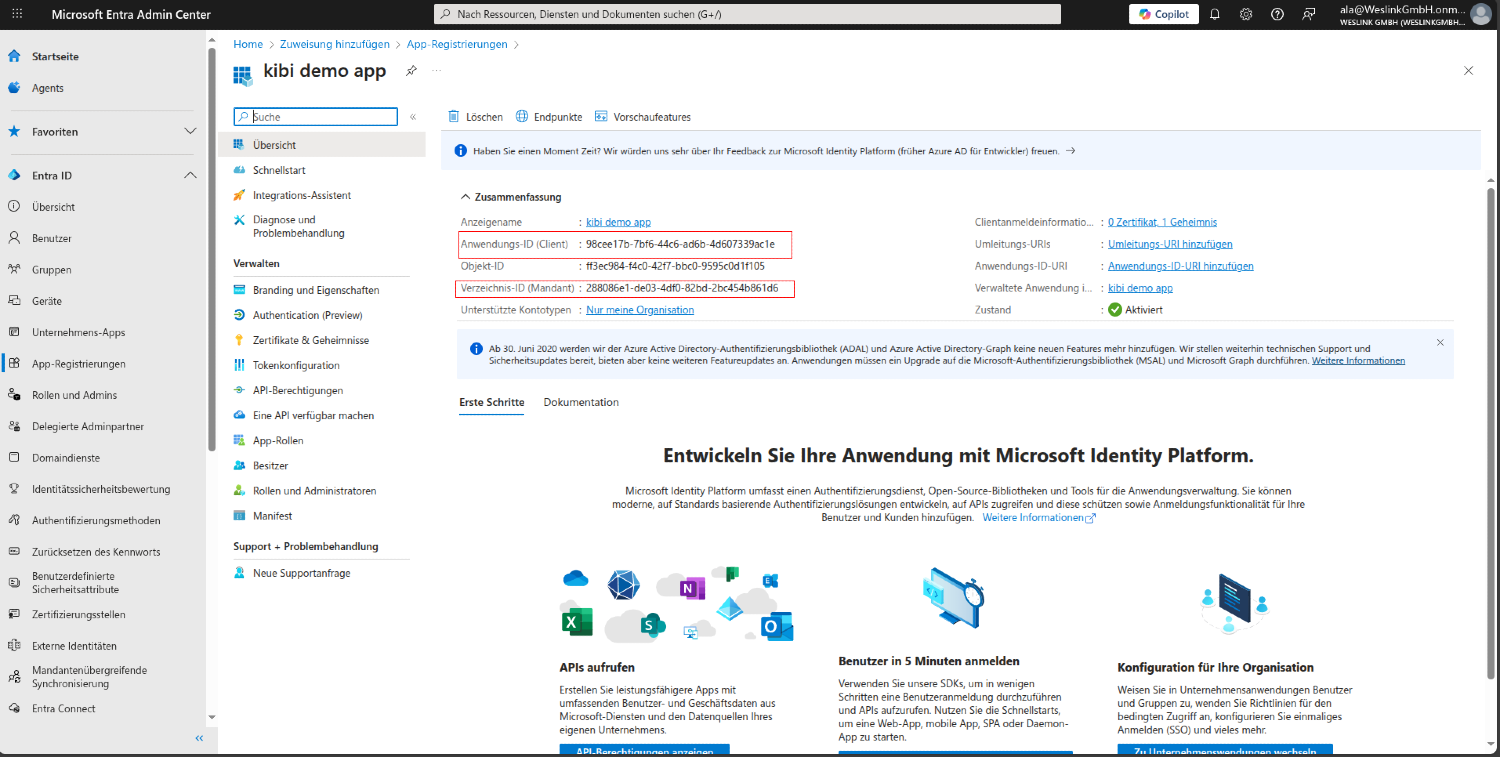
Enter the keys and then click on Save connection settings.
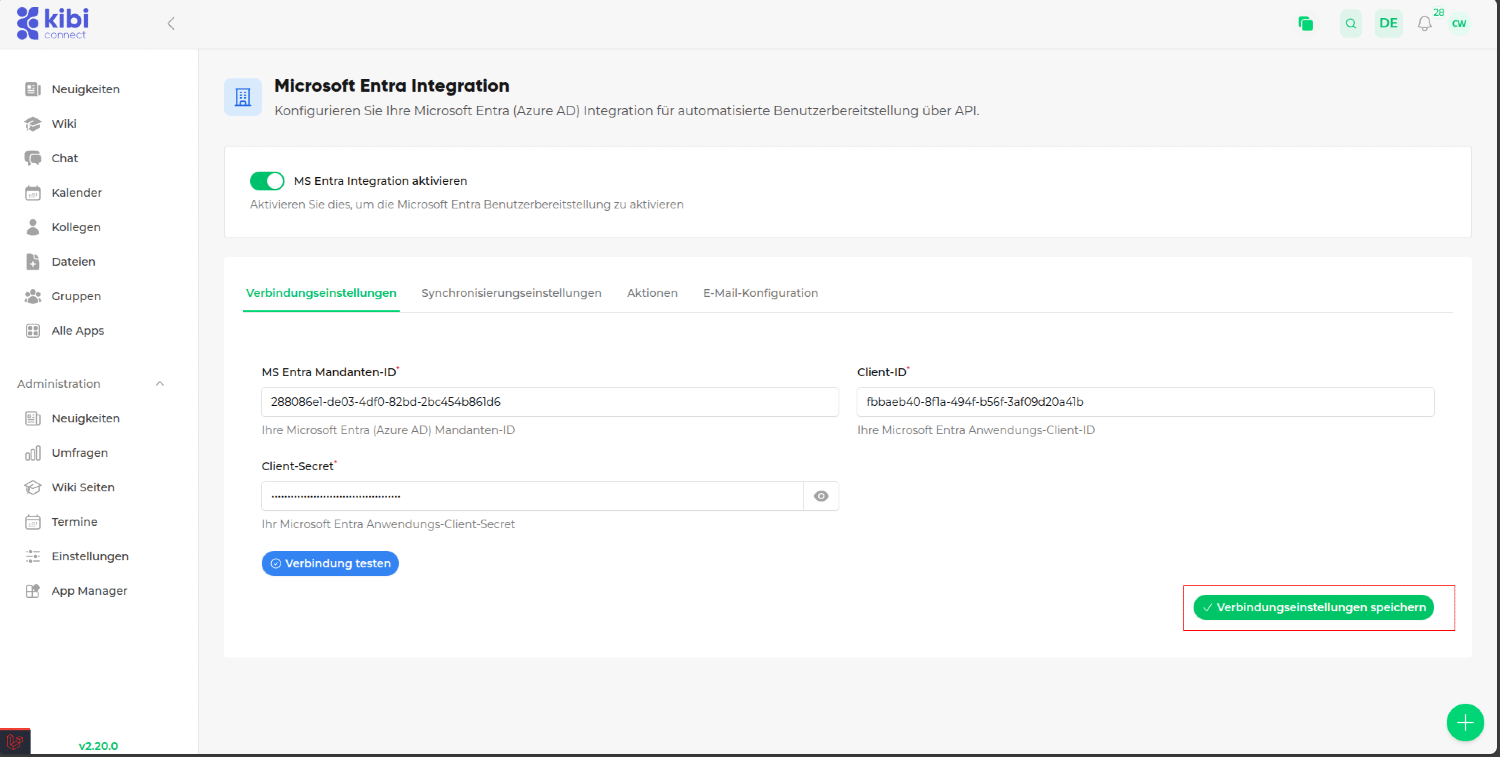
#Step 5.4: Test Connection
After saving the connection settings, you will see the Test Connection button.
Click on Test connection
If the connection is successful, you will see the following message: Credentials valid
#Step 5.5: Enable SSO (Optional)
If you want to use Single Sign-On and have configured the Redirect URI (Step 3b):
Enable the toggle Enable Single Sign-On (SSO)
Check the displayed Redirect URL – this must match the URL configured in Entra
Save the settings
On the login page, a "Sign in with Microsoft" button will now appear for your users.
#Overview: What is Configured Where
Setting |
Where |
Type |
|---|---|---|
App registration |
Microsoft Entra Admin Center |
One-time |
Client Secret |
App registration > Certificates & secrets |
One-time (renew before expiry) |
API Permissions (Sync) |
App registration > API Permissions |
Application permission |
API Permissions (SSO) |
App registration > API Permissions |
Delegated permission |
Redirect URI (SSO) |
App registration > Authentication |
Only for SSO |
User assignment |
Enterprise Application > Users & Groups |
Optional |
Tenant ID, Client ID, Secret |
Kibi Connect > Settings > MS Entra |
One-time |
SAML Configuration |
Not needed |
Ignore |
#6. Automatic Group Assignment
Kibi Connect can automatically assign users to groups based on information from Microsoft Entra (Active Directory). This way, new employees are directly assigned to the correct department or location group.
#Step 6.1: Configure Groups for Mapping
For each group that should be automatically populated, you must set the corresponding mapping field:
Navigate to Group Editing in Kibi Connect.
In the group settings area, you will find two optional fields:
MS Entra Department: Enter the exact department name here as it is stored in Microsoft Entra (e.g., "Customer Service", "Marketing").
MS Entra Office Location: Enter the exact location here as it is stored in Microsoft Entra (e.g., "Berlin", "A13").
Note: These fields are only visible to system administrators and only when the MS Entra integration is active.
#Step 6.2: How Automatic Assignment Works
During each synchronization with Microsoft Entra, the following happens:
Kibi Connect reads the department and location of each user from Microsoft Entra.
If a group has a matching MS Entra Department or Office Location field, the user is automatically assigned to that group.
New groups are automatically created if at least 2 users with the same department or location exist.
Existing group memberships are preserved.
Important: The values in the "MS Entra Department" and "MS Entra Office Location" fields must exactly match the values in Microsoft Entra (case sensitivity is not considered).
#Step 6.3: Example
Assume you have the following structure in Microsoft Entra:
Employee |
Department |
Location (Office Location) |
|---|---|---|
Max Mustermann |
Sales |
Berlin |
Erika Musterfrau |
Sales |
Hamburg |
Hans Beispiel |
Marketing |
Berlin |
And in Kibi Connect you create:
Group "Sales" with MS Entra Department = "Sales"
Group "Location Berlin" with MS Entra Office Location = "Berlin"
After synchronization, Max Mustermann will automatically be assigned to the groups "Sales" and "Location Berlin", Erika Musterfrau to the group "Sales", and Hans Beispiel to the groups "Marketing" (if available) and "Location Berlin".